


How to Build an iOS Document Scanner
Dynamsoft Document Normalizer is an SDK to detect the boundary of documents and runs perspective transformation to get a normalized document image.
In this article, we are going to build an iOS document scanner using Dynamsoft Document Normalizer and AVFoundation.
A demo video of the final result:
The scanning process:
- Start the camera using AVFoundation and analyse the frames to detect the boundary of documents. When the IoUs of three consecutive detected polygons are over 90%, take a photo.
- After the photo is taken, the users are directed to a cropping page. They can drag the vertices to adjust the detected polygons.
- If the user confirms that the polygon is correct, the app then runs perspective correction and cropping to get a normalized document image.
Build an iOS Document Scanner
Let’s do this in steps.
New Project
Open Xcode to create a new UIKit project in Swift.
Since we are going to design the UIs programmatically, we can just delete Main.storyboard and SceneDelegate.swift and update the project and Info.plist to remove relevant info.
Add Dependencies
Here, we use CocoaPods to manage dependencies.
-
Initialize a pod file in the project folder.
pod init -
Add the following line to the
Podfile.pod 'DynamsoftCaptureVisionRouter','2.0.21' pod 'DynamsoftDocumentNormalizer','2.0.20' pod 'DynamsoftCore','3.0.20' pod 'DynamsoftLicense','3.0.30' pod 'DynamsoftImageProcessing','2.0.21' -
Run
pod install
Add Permissions
We have to add the following to Info.plist for the permissions to access the camera and write files to the photo library.
<key>NSCameraUsageDescription</key>
<string>For camera usage</string>
<key>NSPhotoLibraryAddUsageDescription</key>
<string>For saving photos</string>
Initialize the License of Dynamsoft Document Normalizer
In AppDelegate.swift, add the following to initialize the license of Dynamsoft Document Normalizer. You can apply for a 30-day trial license here.
@main
class AppDelegate: UIResponder, UIApplicationDelegate, LicenseVerificationListener  {
    func application(_ application: UIApplication, didFinishLaunchingWithOptions launchOptions: [UIApplication.LaunchOptionsKey: Any]?) -> Bool {
        // Override point for customization after application launch.
        let trialLicense = "LICENSE-KEY";
        LicenseManager.initLicense(trialLicense, verificationDelegate: self)
        return true
    }

    func onLicenseVerified(_ isSuccess: Bool, error: Error?) {
        print(error?.localizedDescription ?? "license error")
    }
}
Next, we are going to implement the pages in steps. There are four pages: home page, camera page, cropper page and result viewer page.
Home Page
Add a Scan Document button to navigate to the camera page.
class ViewController: UIViewController {
    var button: UIButton!
    override func viewDidLoad() {
        super.viewDidLoad()
        // Do any additional setup after loading the view.

        self.button = UIButton(frame: .zero)
        self.button.setTitle("Scan Document", for: .normal)
        self.button.setTitleColor(.systemBlue, for: .normal)
        self.button.setTitleColor(.lightGray, for: .highlighted)

        self.button.addTarget(self,
                         action: #selector(buttonAction),
                         for: .touchUpInside)
        self.navigationItem.title = "Home"

        self.view.backgroundColor = UIColor.white
        self.view.addSubview(self.button)
    }

    override func viewDidLayoutSubviews() {
        super.viewDidLayoutSubviews()
        if let button = self.button {
            let width: CGFloat = 300
            let height: CGFloat = 50
            let x = view.frame.width/2 - width/2
            let y = view.frame.height - 100
            button.frame = CGRect.init(x: x, y: y, width: width, height: height)
        }
    }

    @objc
    func buttonAction() {
        self.navigationController?.pushViewController(CameraController(), animated: true)
    }
}
Since we are not using storyboard, we have to display the home page programmatically in AppDelegate.swift with the following code.
@main
class AppDelegate: UIResponder, UIApplicationDelegate, LicenseVerificationListener  {
    var window: UIWindow?
    func application(_ application: UIApplication, didFinishLaunchingWithOptions launchOptions: [UIApplication.LaunchOptionsKey: Any]?) -> Bool {
        // Override point for customization after application launch.
        window = UIWindow(frame: UIScreen.main.bounds)
        let vc = ViewController()
        let navController = UINavigationController(rootViewController: vc)
        window?.rootViewController = navController
        window?.makeKeyAndVisible()
        //...
        return true
    }
}
Camera Page
Create a new camera view controller named CameraController.swift. Then, we are going to start the camera and detect documents in this page.
Start the Camera using AVFoundation
-
Create a new view named
PreviewViewto display the camera preview.import UIKit //https://developer.apple.com/documentation/avfoundation/capture_setup/setting_up_a_capture_session?language=objc#2958852 class PreviewView: UIView { override class var layerClass: AnyClass { return AVCaptureVideoPreviewLayer.self } /// Convenience wrapper to get layer as its statically known type. var videoPreviewLayer: AVCaptureVideoPreviewLayer { return layer as! AVCaptureVideoPreviewLayer } } -
Add the preview view to the camera controller.
var previewView: PreviewView! override func viewDidLoad() { super.viewDidLoad() self.previewView = PreviewView() self.view.addSubview(self.previewView) } override func viewDidLayoutSubviews() { super.viewDidLayoutSubviews() if let previewView = self.previewView { let width: CGFloat = view.frame.width let height: CGFloat = view.frame.height let x: CGFloat = 0.0 let y: CGFloat = 0.0 previewView.frame = CGRect.init(x: x, y: y, width: width, height: height) } } -
Open the camera and start the capture session.
var captureSession: AVCaptureSession!
func startCamera(){
    // Create the capture session.
    self.captureSession = AVCaptureSession()

    // Find the default video device.
    guard let videoDevice = AVCaptureDevice.default(for: .video) else { return }

    do {
        // Wrap the video device in a capture device input.
        let videoInput = try AVCaptureDeviceInput(device: videoDevice)
        // If the input can be added, add it to the session.
        if self.captureSession.canAddInput(videoInput) {
            self.captureSession.addInput(videoInput)
            self.previewView.videoPreviewLayer.session = self.captureSession

            //set the camera preview's resolution
            self.captureSession.sessionPreset = AVCaptureSession.Preset.hd1920x1080

            self.captureSession.startRunning()
        }
    } catch {
        // Configuration failed. Handle error.
    }
}
Detect Documents from the Camera Preview
-
Import libraries.
import DynamsoftCore import DynamsoftCaptureVisionRouter import DynamsoftDocumentNormalizer -
Create a Capture Vision Router instance which can call Document Normalizer.
var cvr:CaptureVisionRouter = CaptureVisionRouter() -
Update the settings of the Capture Vision Router to add several templtas for document detection and normalization.
func loadTemplate(){ try? cvr.initSettings("{\"CaptureVisionTemplates\": [{\"Name\": \"Default\"},{\"Name\": \"DetectDocumentBoundaries_Default\",\"ImageROIProcessingNameArray\": [\"roi-detect-document-boundaries\"]},{\"Name\": \"DetectAndNormalizeDocument_Default\",\"ImageROIProcessingNameArray\": [\"roi-detect-and-normalize-document\"]},{\"Name\": \"NormalizeDocument_Binary\",\"ImageROIProcessingNameArray\": [\"roi-normalize-document-binary\"]}, {\"Name\": \"NormalizeDocument_Gray\",\"ImageROIProcessingNameArray\": [\"roi-normalize-document-gray\"]}, {\"Name\": \"NormalizeDocument_Color\",\"ImageROIProcessingNameArray\": [\"roi-normalize-document-color\"]}],\"TargetROIDefOptions\": [{\"Name\": \"roi-detect-document-boundaries\",\"TaskSettingNameArray\": [\"task-detect-document-boundaries\"]},{\"Name\": \"roi-detect-and-normalize-document\",\"TaskSettingNameArray\": [\"task-detect-and-normalize-document\"]},{\"Name\": \"roi-normalize-document-binary\",\"TaskSettingNameArray\": [\"task-normalize-document-binary\"]}, {\"Name\": \"roi-normalize-document-gray\",\"TaskSettingNameArray\": [\"task-normalize-document-gray\"]}, {\"Name\": \"roi-normalize-document-color\",\"TaskSettingNameArray\": [\"task-normalize-document-color\"]}],\"DocumentNormalizerTaskSettingOptions\": [{\"Name\": \"task-detect-and-normalize-document\",\"SectionImageParameterArray\": [{\"Section\": \"ST_REGION_PREDETECTION\",\"ImageParameterName\": \"ip-detect-and-normalize\"},{\"Section\": \"ST_DOCUMENT_DETECTION\",\"ImageParameterName\": \"ip-detect-and-normalize\"},{\"Section\": \"ST_DOCUMENT_NORMALIZATION\",\"ImageParameterName\": \"ip-detect-and-normalize\"}]},{\"Name\": \"task-detect-document-boundaries\",\"TerminateSetting\": {\"Section\": \"ST_DOCUMENT_DETECTION\"},\"SectionImageParameterArray\": [{\"Section\": \"ST_REGION_PREDETECTION\",\"ImageParameterName\": \"ip-detect\"},{\"Section\": \"ST_DOCUMENT_DETECTION\",\"ImageParameterName\": \"ip-detect\"},{\"Section\": \"ST_DOCUMENT_NORMALIZATION\",\"ImageParameterName\": \"ip-detect\"}]},{\"Name\": \"task-normalize-document-binary\",\"StartSection\": \"ST_DOCUMENT_NORMALIZATION\", \"ColourMode\": \"ICM_BINARY\",\"SectionImageParameterArray\": [{\"Section\": \"ST_REGION_PREDETECTION\",\"ImageParameterName\": \"ip-normalize\"},{\"Section\": \"ST_DOCUMENT_DETECTION\",\"ImageParameterName\": \"ip-normalize\"},{\"Section\": \"ST_DOCUMENT_NORMALIZATION\",\"ImageParameterName\": \"ip-normalize\"}]}, {\"Name\": \"task-normalize-document-gray\", \"ColourMode\": \"ICM_GRAYSCALE\",\"StartSection\": \"ST_DOCUMENT_NORMALIZATION\",\"SectionImageParameterArray\": [{\"Section\": \"ST_REGION_PREDETECTION\",\"ImageParameterName\": \"ip-normalize\"},{\"Section\": \"ST_DOCUMENT_DETECTION\",\"ImageParameterName\": \"ip-normalize\"},{\"Section\": \"ST_DOCUMENT_NORMALIZATION\",\"ImageParameterName\": \"ip-normalize\"}]}, {\"Name\": \"task-normalize-document-color\", \"ColourMode\": \"ICM_COLOUR\",\"StartSection\": \"ST_DOCUMENT_NORMALIZATION\",\"SectionImageParameterArray\": [{\"Section\": \"ST_REGION_PREDETECTION\",\"ImageParameterName\": \"ip-normalize\"},{\"Section\": \"ST_DOCUMENT_DETECTION\",\"ImageParameterName\": \"ip-normalize\"},{\"Section\": \"ST_DOCUMENT_NORMALIZATION\",\"ImageParameterName\": \"ip-normalize\"}]}],\"ImageParameterOptions\": [{\"Name\": \"ip-detect-and-normalize\",\"BinarizationModes\": [{\"Mode\": \"BM_LOCAL_BLOCK\",\"BlockSizeX\": 0,\"BlockSizeY\": 0,\"EnableFillBinaryVacancy\": 0}],\"TextDetectionMode\": {\"Mode\": \"TTDM_WORD\",\"Direction\": \"HORIZONTAL\",\"Sensitivity\": 7}},{\"Name\": \"ip-detect\",\"BinarizationModes\": [{\"Mode\": \"BM_LOCAL_BLOCK\",\"BlockSizeX\": 0,\"BlockSizeY\": 0,\"EnableFillBinaryVacancy\": 0,\"ThresholdCompensation\" : 7}],\"TextDetectionMode\": {\"Mode\": \"TTDM_WORD\",\"Direction\": \"HORIZONTAL\",\"Sensitivity\": 7},\"ScaleDownThreshold\" : 512},{\"Name\": \"ip-normalize\",\"BinarizationModes\": [{\"Mode\": \"BM_LOCAL_BLOCK\",\"BlockSizeX\": 0,\"BlockSizeY\": 0,\"EnableFillBinaryVacancy\": 0}],\"TextDetectionMode\": {\"Mode\": \"TTDM_WORD\",\"Direction\": \"HORIZONTAL\",\"Sensitivity\": 7}}]}") } -
Add a video output so that we can get the data of the camera preview.
func startCamera(){ // Create the capture session. self.captureSession = AVCaptureSession() // Find the default video device. guard let videoDevice = AVCaptureDevice.default(for: .video) else { return } do { // Wrap the video device in a capture device input. let videoInput = try AVCaptureDeviceInput(device: videoDevice) // If the input can be added, add it to the session. if self.captureSession.canAddInput(videoInput) { self.captureSession.addInput(videoInput) self.previewView.videoPreviewLayer.session = self.captureSession //set the camera preview's resolution self.captureSession.sessionPreset = AVCaptureSession.Preset.hd1920x1080 + self.videoOutput = AVCaptureVideoDataOutput.init() + if self.captureSession.canAddOutput(self.videoOutput) { + self.captureSession.addOutput(videoOutput) + } + + var queue:DispatchQueue + queue = DispatchQueue(label: "queue") + self.videoOutput.setSampleBufferDelegate(self as AVCaptureVideoDataOutputSampleBufferDelegate, queue: queue) + self.videoOutput.videoSettings = [kCVPixelBufferPixelFormatTypeKey : kCVPixelFormatType_32BGRA] as [String : Any] self.captureSession.startRunning() } } catch { // Configuration failed. Handle error. } } + func captureOutput(_ output: AVCaptureOutput, didOutput sampleBuffer: CMSampleBuffer, from connection: AVCaptureConnection){ + print("capture output") + } -
Convert
CMSampleBuffertoiImageDataand then use Dynamsoft Document Normalizer to detect documents from the data.//convert CMSampleBuffer to iImageData let imageBuffer:CVImageBuffer = CMSampleBufferGetImageBuffer(sampleBuffer)! CVPixelBufferLockBaseAddress(imageBuffer, .readOnly) let baseAddress = CVPixelBufferGetBaseAddress(imageBuffer) let bufferSize = CVPixelBufferGetDataSize(imageBuffer) let width = CVPixelBufferGetWidth(imageBuffer) let height = CVPixelBufferGetHeight(imageBuffer) let bpr = CVPixelBufferGetBytesPerRow(imageBuffer) CVPixelBufferUnlockBaseAddress(imageBuffer, .readOnly) let buffer = Data(bytes: baseAddress!, count: bufferSize) let imageData = ImageData.init() imageData.bytes = buffer imageData.width = UInt(width) imageData.height = UInt(height) imageData.stride = UInt(bpr) imageData.format = .ABGR8888 //detect documents from the data let capturedResult = cvr.captureFromBuffer(imageData, templateName: "DetectDocumentBoundaries_Default")
Draw the Detected Document Polygon
-
Create an
Overlayview to draw the polygon.class Overlay: UIView { var points:[CGPoint] = [] override func draw(_ rect: CGRect) { if points.count == 4 { let aPath = UIBezierPath() aPath.move(to: points[0]) aPath.addLine(to: points[1]) aPath.move(to: points[1]) aPath.addLine(to: points[2]) aPath.move(to: points[2]) aPath.addLine(to: points[3]) aPath.move(to: points[3]) aPath.addLine(to: points[0]) // Keep using the method addLine until you get to the one where about to close the path aPath.close() // If you want to stroke it with a red color UIColor.red.set() aPath.lineWidth = 3 aPath.stroke() } } } -
Add the overlay view and set its position and size just like the preview view.
override func viewDidLoad() { super.viewDidLoad() // Do any additional setup after loading the view. self.overlay = Overlay() self.view.addSubview(self.overlay) } override func viewDidLayoutSubviews() { super.viewDidLayoutSubviews() if let overlay = self.overlay { let width: CGFloat = view.frame.width let height: CGFloat = view.frame.height let x: CGFloat = 0.0 let y: CGFloat = 0.0 overlay.backgroundColor = UIColor.init(red: 0, green: 0, blue: 0, alpha: 0) overlay.frame = CGRect.init(x: x, y: y, width: width, height: height) } } -
Pass the points data of the detected document to the overlay view.
let capturedResult = cvr.captureFromBuffer(imageData, templateName: "DetectDocumentBoundaries_Default")
let results = capturedResult.items
if results != nil {
    print(results?.count ?? 0)
    if results?.count ?? 0>0 {
        let result = results?[0] as! DetectedQuadResultItem
        DispatchQueue.main.async {
            var points = result.location.points as! [CGPoint]
            points = Utils.scaleAndRotatePoints(points, frameWidth: Double(width), frameHeight: Double(height), viewWidth: self.view.frame.width, viewHeight: self.view.frame.height)
            self.overlay.points = points
            self.overlay.setNeedsDisplay() //trigger the redrawing
        }
    }
}
We have to modify the points to correctly draw the polygon. First, we need to scale the points based on the view’s size and the camera preview image’s size. Second, if the phone is in portrait, while the camera preview is landscape, we need to rotate the coordinates of the points.
Here is the code:
class Utils {
    static func scaleAndRotatePoints(_ points:[CGPoint], frameWidth:Double, frameHeight:Double,viewWidth:Double, viewHeight:Double) -> [CGPoint]{
        var newPoints:[CGPoint] = []
        for point in points {
            var x = point.x
            var y = point.y

            let orientation = UIDevice.current.orientation
            if  orientation == .portrait || orientation == .unknown || orientation == .faceUp {
                x = frameHeight - point.y;
                y = point.x;
            } else if orientation == .landscapeRight {
                x = frameWidth - point.x;
                y = frameHeight - point.y;
            }

            x = x * xPercent(frameWidth:frameWidth,frameHeight:frameHeight,viewWidth:viewWidth,viewHeight:viewHeight)
            y = y * yPercent(frameWidth:frameWidth,frameHeight:frameHeight,viewWidth:viewWidth,viewHeight:viewHeight)
            let newPoint = CGPoint(x: x, y: y)
            newPoints.append(newPoint)
        }
        return newPoints
    }

    static func xPercent(frameWidth:Double, frameHeight:Double,viewWidth:Double, viewHeight:Double) -> Double {
        if (frameWidth>frameHeight && viewWidth>viewHeight) {
            return viewWidth/frameWidth
        }else{
            return viewWidth/frameHeight
        }
    }

    static func yPercent(frameWidth:Double, frameHeight:Double,viewWidth:Double, viewHeight:Double) -> Double {
        if (frameWidth>frameHeight && viewWidth>viewHeight) {
            return viewHeight/frameHeight
        }else{
            return viewHeight/frameWidth
        }
    }
}
Check if the Detected Document is Steady
We can check the IoUs (intersection of union) of three consecutive polygons to infer if the detected document is steady.
-
In the
Utilsclass, add helper functions to calculate the IoU value.static func intersectionOverUnion(pts1:[CGPoint] ,pts2:[CGPoint]) -> Double { let rect1 = getRectFromPoints(points:pts1); let rect2 = getRectFromPoints(points:pts2); return rectIntersectionOverUnion(rect1:rect1, rect2:rect2); } static func rectIntersectionOverUnion(rect1:CGRect, rect2:CGRect) -> Double { let leftColumnMax = max(rect1.minX, rect2.minX); let rightColumnMin = min(rect1.maxX,rect2.maxX); let upRowMax = max(rect1.minY, rect2.minY); let downRowMin = min(rect1.maxY,rect2.maxY); if (leftColumnMax>=rightColumnMin || downRowMin<=upRowMax){ return 0; } let s1 = rect1.width*rect1.height; let s2 = rect2.width*rect2.height; let sCross = (downRowMin-upRowMax)*(rightColumnMin-leftColumnMax); return sCross/(s1+s2-sCross); } static func getRectFromPoints(points:[CGPoint]) -> CGRect { var minX,minY,maxX,maxY:CGFloat minX = points[0].x minY = points[0].y maxX = 0 maxY = 0 for point in points { minX = min(point.x,minX) minY = min(point.y,minY) maxX = max(point.x,maxX) maxY = max(point.y,maxY) } let r = CGRect(x: minX, y: minY, width: maxX-minX, height: maxY-minY) return r } -
Store detection results in an array. If the count of the array reaches 3, check if the detected document is steady.
let capturedResult = cvr.captureFromBuffer(imageData, templateName: "DetectDocumentBoundaries_Default")
let results = capturedResult.items
if results != nil {
    print(results?.count ?? 0)
    if results?.count ?? 0>0 {
        let result = results?[0] as! DetectedQuadResultItem
        if self.previousResults.count == 2 {
            self.previousResults.append(result)
            if steady() {
                print("steady")
                //do action
            }else{
                self.previousResults.remove(at: 0)
            }
        }else{
            self.previousResults.append(result)
        }
    }
}
The
steadyfunction which checks the IoUs.func steady() -> Bool { let points1,points2,points3:[CGPoint] points1 = self.previousResults[0].location.points as! [CGPoint] points2 = self.previousResults[1].location.points as! [CGPoint] points3 = self.previousResults[2].location.points as! [CGPoint] let iou1 = Utils.intersectionOverUnion(pts1: points1,pts2: points2) let iou2 = Utils.intersectionOverUnion(pts1: points1,pts2: points3) let iou3 = Utils.intersectionOverUnion(pts1: points2,pts2: points3) if iou1>0.9 && iou2>0.9 && iou3>0.9 { return true }else{ return false } }
Take a Photo if the Detected Document is Steady
After the detected document is steady, we can take a high-resolution photo.
-
Add photo output to the capture session. Remember to enable high resolution capture so that we can take a photo with a resolution higher than the camera preview’s.
self.photoOutput = AVCapturePhotoOutput() self.photoOutput.isHighResolutionCaptureEnabled = true if self.captureSession.canAddOutput(self.photoOutput) { self.captureSession.addOutput(photoOutput) } -
Take a photo if the detected document is steady and then navigate to the cropper page.
func takePhoto(){
    let photoSettings: AVCapturePhotoSettings
    photoSettings = AVCapturePhotoSettings()
    photoSettings.isHighResolutionPhotoEnabled = true
    self.photoOutput.capturePhoto(with: photoSettings, delegate: self)
}

func photoOutput(_ output: AVCapturePhotoOutput, didFinishProcessingPhoto photo: AVCapturePhoto, error: Error?) {
    if let error = error {
        print("Error:", error)
    } else {
        self.captureSession.stopRunning() //stop the camera if the photo is taken.
        if let imageData = photo.fileDataRepresentation() {
            let image = UIImage(data: imageData)
            navigateToCropper(image!)
        }
    }
}

func navigateToCropper(_ image:UIImage){
    let controller = CroppingController()
    //pass the photo taken and the instance of Document Normalizer for further use
    controller.image = image
    controller.cvr = self.cvr
    navigationController?.pushViewController(controller, animated: true)
}
Cropper Page
In the cropper page, we can adjust the detected document polygon.
-
Rectify the orientation of the image taken.
The image taken in portrait will have an image orientation value so that it can be displayed in portrait like in a UIImageView, while its inner data is still in landscape. We need to rectify the orientation with the following code.
static func normalizedImage(_ image:UIImage) -> UIImage { if image.imageOrientation == UIImage.Orientation.up { return image } UIGraphicsBeginImageContextWithOptions(image.size, false, image.scale) image.draw(in: CGRect(x:0,y:0,width:image.size.width,height:image.size.height)) let normalized = UIGraphicsGetImageFromCurrentImageContext()! UIGraphicsEndImageContext(); return normalized } -
Display the image taken in a fullscreen size UIImageView.
class CroppingController: UIViewController { var imageView: UIImageView! override func viewDidLoad() { super.viewDidLoad() // Do any additional setup after loading the view. self.image = Utils.normalizedImage(self.image) self.imageView = UIImageView(frame: .zero) self.imageView.image = self.image self.view.addSubview(self.imageView) } } override func viewDidLayoutSubviews() { super.viewDidLayoutSubviews() if let imageView = self.imageView { let width: CGFloat = view.frame.width let height: CGFloat = view.frame.height let x: CGFloat = 0.0 let y: CGFloat = 0.0 imageView.frame = CGRect.init(x: x, y: y, width: width, height: height) } } -
Detect the document in the image taken and draw the overlay.
Similar to what we’ve done in the camera page, detect the document and draw the overlay. Since we are using the photo with the orientation rectified, we only need to scale the points for the overlay view.
func detect(){ if let cvr = self.cvr { let capturedResult = cvr.captureFromImage(self.image,templateName: "DetectDocumentBoundaries_Default") let results = capturedResult.items if results?.count ?? 0 > 0 { let result = results?[0] as! DetectedQuadResultItem self.points = result.location.points as? [CGPoint] let CGPoints = Utils.scalePoints(self.points, xPercent: self.view.frame.width/self.image.size.width, yPercent: self.view.frame.height/self.image.size.height) showVertices(CGPoints) self.overlay.points = CGPoints self.overlay.setNeedsDisplay() } } } -
Define a
Verticeclass for adjusting the polygon.import UIKit class Vertice: UIView { var lineWidth = 3.0 override func draw(_ rect: CGRect) { let h = rect.height let w = rect.width let color:UIColor = UIColor.red let drect = CGRect(x: 0, y: 0, width: w, height: h) let bpath:UIBezierPath = UIBezierPath(rect: drect) color.set() bpath.lineWidth = lineWidth bpath.stroke() } } -
Add four vertices.
var vertices:[Vertice] = []
func showVertices(_ CGPoints:[CGPoint]){
    let verticeSize = 24.0
    var index = 0
    for point in CGPoints {
        let vertice = Vertice()
        self.view.addSubview(vertice)
        let tapGesture = UITapGestureRecognizer(target: self, action:  #selector (self.tapActionForVertice (_:)))
        vertice.addGestureRecognizer(tapGesture)
        vertice.backgroundColor = UIColor.init(red: 255, green: 0, blue: 0, alpha: 0.5)
        let x = point.x + getOffsetX(index: index, size: verticeSize)
        let y = point.y + getOffsetY(index: index, size: verticeSize)
        vertice.frame = CGRect.init(x: x, y: y, width: verticeSize, height: verticeSize)
        vertices.append(vertice)
        index = index + 1
    }
}

func getOffsetX(index:Int, size:Double) -> Double {
    if index == 0 {
        return -size
    }else if index == 1 {
        return 0
    }else if index == 2 {
        return 0
    }else {
        return -size
    }
}

func getOffsetY(index:Int, size:Double) -> Double {
    if index == 0 {
        return -size
    }else if index == 1 {
        return -size
    }else if index == 2 {
        return 0
    }else {
        return 0
    }
}
The vertices will be displayed as the following.
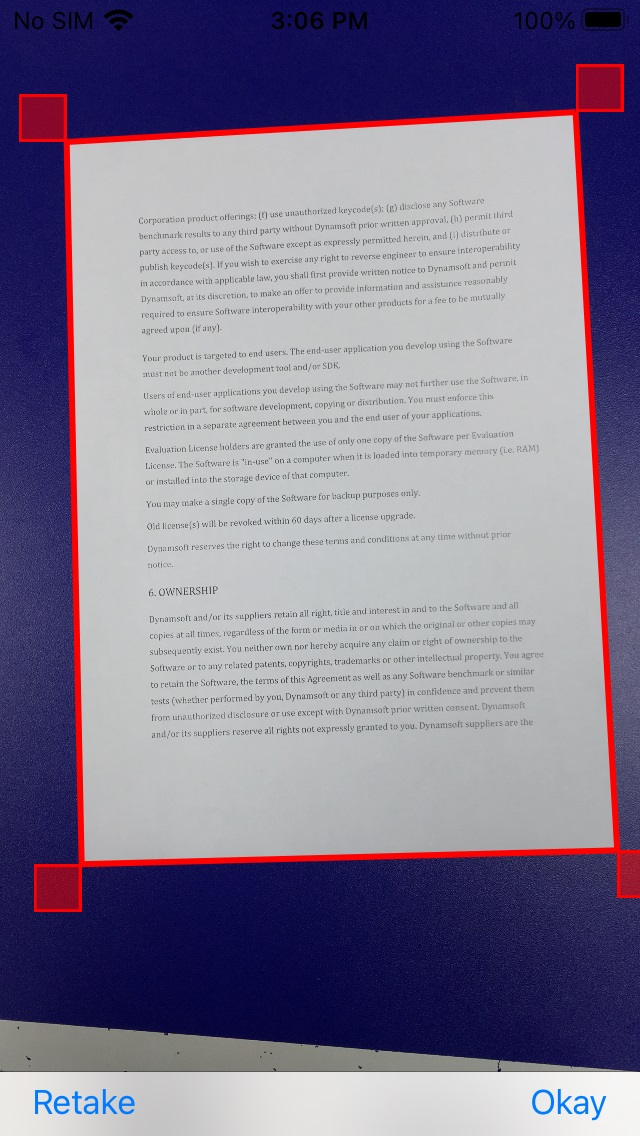
-
UITapGestureRecognizeris added to each vertice. If one of the vertices is tapped, set it as the selected vertice.let tapGesture = UITapGestureRecognizer(target: self, action: #selector (self.tapActionForVertice (_:))) vertice.addGestureRecognizer(tapGesture)The tap action:
@objc func tapActionForVertice(_ sender:UITapGestureRecognizer){ self.selectedVertice = sender.view as! Vertice for vertice in vertices { if self.selectedVertice == vertice { vertice.lineWidth = 5 }else{ vertice.lineWidth = 3 } vertice.setNeedsDisplay() } } -
Add a
UIPanGestureRecognizerfor the view.let panGesture = UIPanGestureRecognizer(target: self, action: #selector (self.panAction (_:))) self.view.addGestureRecognizer(panGesture) -
Move the selected vertice and update the points data if the user pans the view.
var points:[CGPoint]! var vertices:[Vertice] = [] var selectedVertice:Vertice! var touchedX = -1.0 var touchedY = -1.0 var initialVerticeX = -1.0 var initialVerticeY = -1.0 @objc func panAction(_ sender:UIPanGestureRecognizer){ if selectedVertice != nil { let point = sender.location(in: self.view) let translation = sender.translation(in: self.view) let pTouchedX = point.x - translation.x let pTouchedY = point.y - translation.y if pTouchedX != self.touchedX || pTouchedY != self.touchedY { self.touchedX = pTouchedX self.touchedY = pTouchedY self.initialVerticeX = selectedVertice.frame.minX self.initialVerticeY = selectedVertice.frame.minY } var x = self.initialVerticeX + translation.x var y = self.initialVerticeY + translation.y let width = selectedVertice.frame.width let height = selectedVertice.frame.height selectedVertice.frame = CGRect.init(x: x, y: y, width: width, height: height) let selectedIndex = vertices.firstIndex(of: selectedVertice)! x = x - getOffsetX(index: selectedIndex, size: 24) y = y - getOffsetY(index: selectedIndex, size: 24) updatePoints(newX:x,newY:y) } } func updatePoints(newX:Double,newY:Double) { if selectedVertice != nil { let selectedIndex = vertices.firstIndex(of: selectedVertice)! var point = self.points[selectedIndex] let xPercent = self.view.frame.width/self.image.size.width let yPercent = self.view.frame.height/self.image.size.height point.x = newX/xPercent point.y = newY/yPercent self.points[selectedIndex] = point var pointForView = self.overlay.points[selectedIndex] pointForView.x = newX pointForView.y = newY self.overlay.points[selectedIndex] = pointForView self.overlay.setNeedsDisplay() } } -
Add a toolbar with two buttons: a
retakebutton to return to the camera page and anokaybutton to navigate to the result viewer page.var toolbar:UIToolbar! override func viewDidLoad() { self.toolbar = UIToolbar.init() let retakeButton = UIBarButtonItem.init(title: "Retake", style: .plain, target: self, action: #selector(retakeAction)) let okayButton = UIBarButtonItem.init(title: "Okay", style: .plain, target: self, action: #selector(okayAction)) let flexibleSpace = UIBarButtonItem.flexibleSpace() self.toolbar.items = [retakeButton,flexibleSpace,okayButton] self.view.addSubview(self.toolbar) } override func viewDidLayoutSubviews() { super.viewDidLayoutSubviews() if let toolbar = self.toolbar { let width: CGFloat = view.frame.width let height: CGFloat = 32 let x: CGFloat = 0.0 let y: CGFloat = view.frame.height - 32 toolbar.frame = CGRect.init(x: x, y: y, width: width, height: height) } } @objc func retakeAction() { self.navigationController?.popViewController(animated: true) } @objc func okayAction() { let vc = ResultViewerController() vc.points = self.points vc.ddn = self.ddn vc.image = self.image self.navigationController?.pushViewController(vc, animated:true) }
Result Viewer Page
In the result viewer page, get the normalized image and display it in an UIImageView and add a save button to save the image to the photo library.
import UIKit
import DynamsoftCore
import DynamsoftCaptureVisionRouter
import DynamsoftDocumentNormalizer

class ResultViewerController: UIViewController {
    var imageView: UIImageView!
    var image: UIImage!
    var cvr:CaptureVisionRouter!
    var points:[CGPoint]!
    override func viewDidLoad() {
        super.viewDidLoad()
        // Do any additional setup after loading the view.
        self.view.backgroundColor = UIColor.white
        self.imageView = UIImageView(frame: .zero)
        self.imageView.contentMode = UIView.ContentMode.scaleAspectFit
        self.view.addSubview(self.imageView)
        self.navigationItem.rightBarButtonItem = UIBarButtonItem(title: "Save",
                                                                 style: .plain,
                                                                 target: self,
                                                                 action: #selector(saveAction))
        normalize()
    }

    override func viewDidAppear(_ animated: Bool) {
        super.viewDidAppear(animated)

    }

    func normalize(){
        let quad = Quadrilateral.init(pointArray: points)
        let settings = try? cvr.getSimplifiedSettings("NormalizeDocument_Binary")
        settings?.roi = quad
        settings?.roiMeasuredInPercentage = false
        try? cvr.updateSettings("NormalizeDocument_Binary", settings: settings!)
        let capturedResult = cvr.captureFromImage(self.image, templateName: "NormalizeDocument_Binary")
        let results = capturedResult.items
        if results != nil {
            if results?.count ?? 0 > 0 {
                let normalizedResult = results?[0] as! NormalizedImageResultItem
                let normazliedImage = try? normalizedResult.imageData?.toUIImage()
                self.imageView.image = normazliedImage
            }
        }


    }

    override func viewDidLayoutSubviews() {
        super.viewDidLayoutSubviews()
        if let imageView = self.imageView {
            let width: CGFloat = self.view.frame.width
            let height: CGFloat = self.view.frame.height
            let x = 0.0
            let y = 0.0
            imageView.frame = CGRect.init(x: x, y: y, width: width, height: height)
        }
    }

    @objc
    func saveAction(){
        print("save")
        UIImageWriteToSavedPhotosAlbum(self.imageView.image!, self, #selector(saved(_:didFinishSavingWithError:contextInfo:)),nil)
    }

    @objc func saved(_ image: UIImage, didFinishSavingWithError error: NSError?, contextInfo: UnsafeRawPointer) {
        if let error = error {
            // we got back an error!
            let ac = UIAlertController(title: "Save error", message: error.localizedDescription, preferredStyle: .alert)
            ac.addAction(UIAlertAction(title: "OK", style: .default))
            present(ac, animated: true)
        } else {
            let ac = UIAlertController(title: "Saved!", message: "The image has been saved to your photos.", preferredStyle: .alert)
            ac.addAction(UIAlertAction(title: "OK", style: .default))
            present(ac, animated: true)
        }
    }
}
Source Code
Get the source code of the demo to have a try: https://github.com/tony-xlh/iOS-Document-Scanner