

Decode Unreadable Barcodes with Dynamsoft Barcode Reader's Custom Scan Parameters
Binarized image produced by Dynamsoft Barcode Reader:
JSON Template (help):
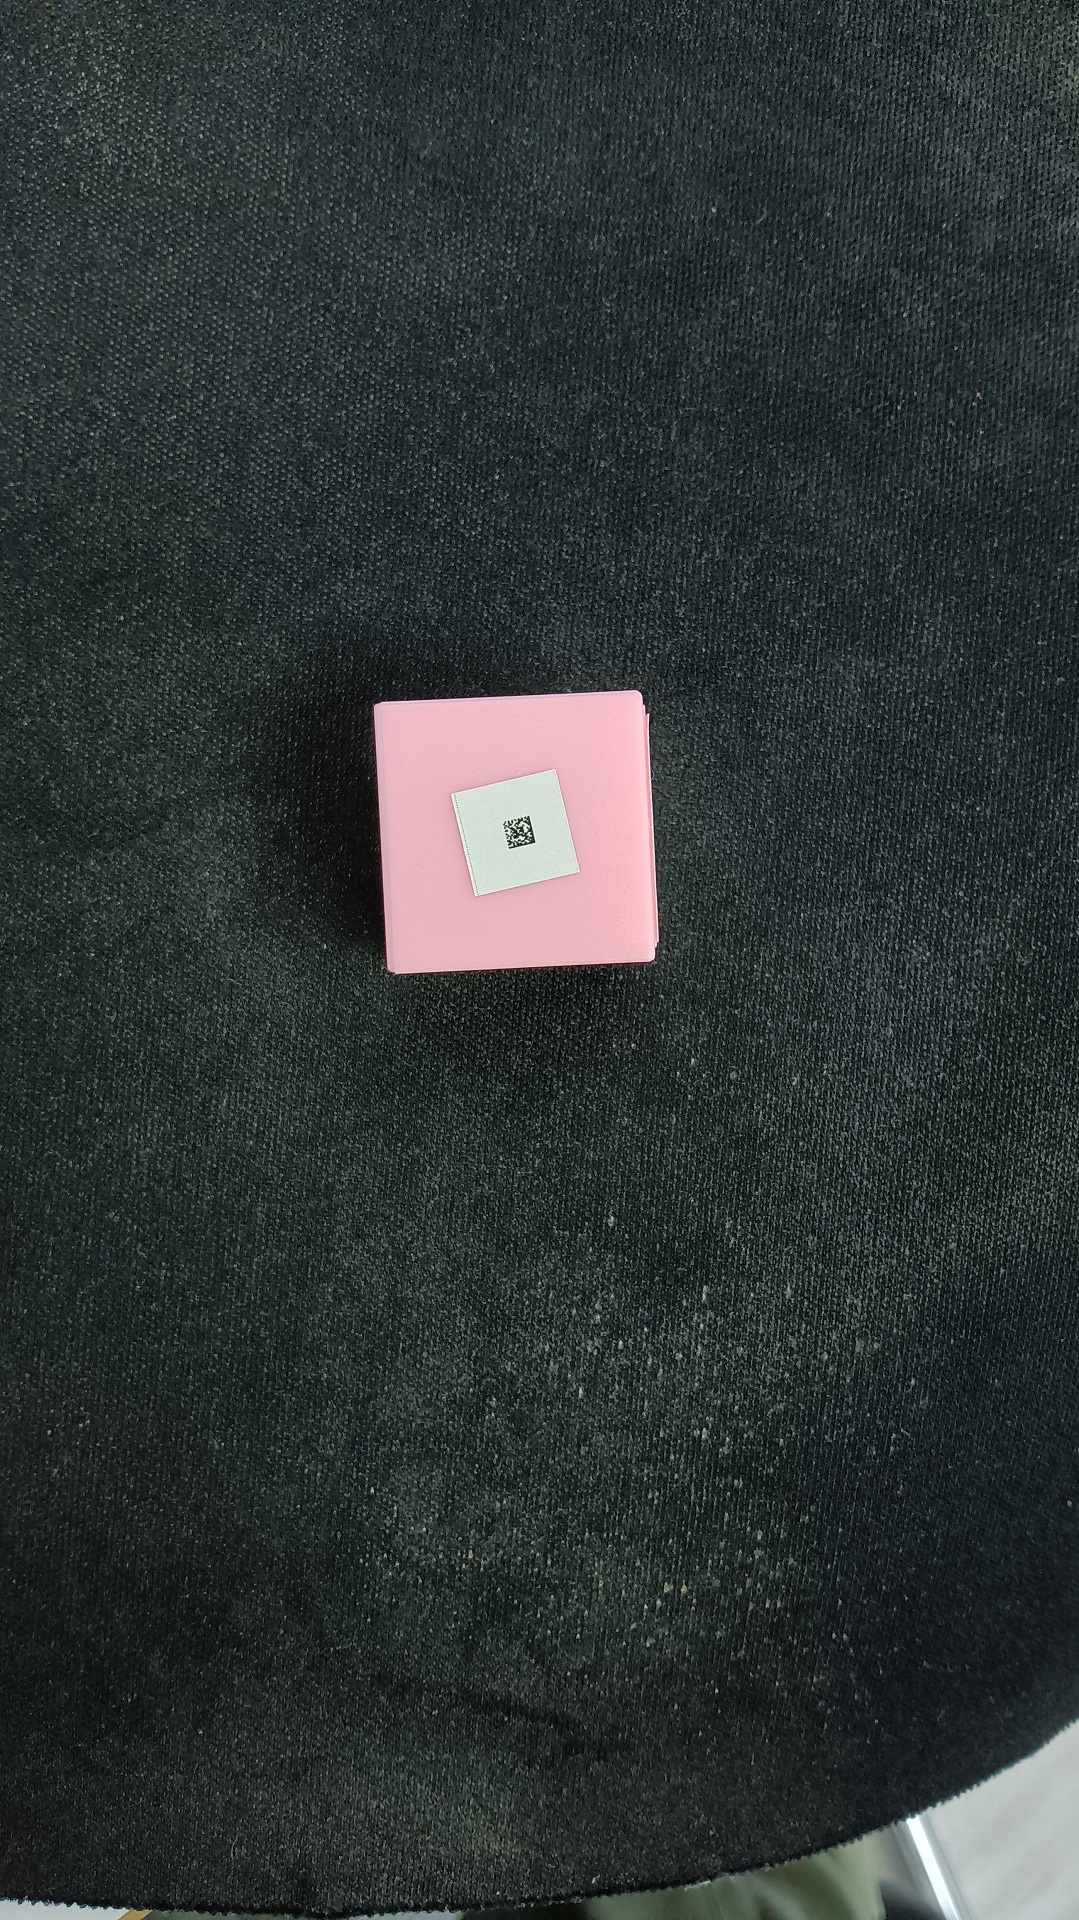
Issue: Reading a small barcode within a large image can be challenging, especially when the barcode is slightly blurred, has small modules, or is affected by background interference. This makes it difficult for a barcode reader to accurately scan the code. In the sample image, a 2 mm x 2 mm DataMatrix code is shown where the camera cannot be positioned too close to the barcode.
Solution: The Dynamsoft Barcode Reader SDK offers flexible APIs, enabling developers to build a custom barcode scanner for various usage scenarios such as reading small barcodes at a distance. For this scenario, we recommend the following adjustments:
- Reduce the blocksize to minimize background interference during binarization and make the modules clearer.
- Set DeblurModes to
nullto let the program decide which deblur algorithms to use to enhance clarity for slightly blurred codes. - Enable ScaleUpModes to enlarge very small modules for improved readability.
{
"BarcodeReaderTaskSettingOptions" :
[
{
"BarcodeColourModes" : null,
"BarcodeComplementModes" :
[
{
"Mode" : "BCM_SKIP"
}
],
"BarcodeFormatIds" :
[
"BF_DEFAULT"
],
"BaseBarcodeReaderTaskSettingName" : "",
"DPMCodeReadingModes" :
[
{
"BarcodeFormat" : "BF_DATAMATRIX",
"Mode" : "DPMCRM_SKIP"
}
],
"DeblurModes" : null,
"DeformationResistingModes" :
[
{
"BinarizationMode" :
{
"BinarizationThreshold" : -1,
"BlockSizeX" : 0,
"BlockSizeY" : 0,
"EnableFillBinaryVacancy" : 1,
"GrayscaleEnhancementModesIndex" : -1,
"Mode" : "BM_LOCAL_BLOCK",
"MorphOperation" : "Close",
"MorphOperationKernelSizeX" : -1,
"MorphOperationKernelSizeY" : -1,
"MorphShape" : "Rectangle",
"ThresholdCompensation" : 10
},
"GrayscaleEnhancementMode" :
{
"Mode" : "GEM_AUTO",
"Sensitivity" : -1,
"SharpenBlockSizeX" : -1,
"SharpenBlockSizeY" : -1,
"SmoothBlockSizeX" : -1,
"SmoothBlockSizeY" : -1
},
"Level" : 5,
"Mode" : "DRM_SKIP"
}
],
"ExpectedBarcodesCount" : 0,
"LocalizationModes" :
[
{
"ConfidenceThreshold" : 60,
"IsOneDStacked" : 0,
"Mode" : "LM_CONNECTED_BLOCKS",
"ModuleSize" : 0,
"ScanDirection" : 0,
"ScanStride" : 0
},
{
"ConfidenceThreshold" : 60,
"IsOneDStacked" : 0,
"Mode" : "LM_SCAN_DIRECTLY",
"ModuleSize" : 0,
"ScanDirection" : 0,
"ScanStride" : 0
},
{
"ConfidenceThreshold" : 60,
"IsOneDStacked" : 0,
"Mode" : "LM_STATISTICS",
"ModuleSize" : 0,
"ScanDirection" : 0,
"ScanStride" : 0
},
{
"ConfidenceThreshold" : 60,
"IsOneDStacked" : 0,
"Mode" : "LM_LINES",
"ModuleSize" : 0,
"ScanDirection" : 0,
"ScanStride" : 0
}
],
"MaxThreadsInOneTask" : 4,
"Name" : "BR_1",
"ReturnBarcodeZoneClarity" : 0,
"SectionImageParameterArray" :
[
{
"ContinueWhenPartialResultsGenerated" : 1,
"ImageParameterName" : "IP_1",
"Section" : "ST_REGION_PREDETECTION"
},
{
"ContinueWhenPartialResultsGenerated" : 1,
"ImageParameterName" : "IP_1",
"Section" : "ST_BARCODE_LOCALIZATION"
},
{
"ContinueWhenPartialResultsGenerated" : 1,
"ImageParameterName" : "IP_Decode",
"Section" : "ST_BARCODE_DECODING"
}
],
"StartSection" : "ST_REGION_PREDETECTION",
"TerminateSetting" :
{
"Section" : "ST_NULL",
"Stage" : "IRUT_NULL"
},
"TextResultOrderModes" :
[
{
"Mode" : "TROM_CONFIDENCE"
},
{
"Mode" : "TROM_POSITION"
},
{
"Mode" : "TROM_FORMAT"
}
]
}
],
"CaptureVisionTemplates" :
[
{
"ImageROIProcessingNameArray" :
[
"roi_default"
],
"ImageSource" : "",
"MaxParallelTasks" : 4,
"MinImageCaptureInterval" : 0,
"Name" : "Default_1",
"OutputOriginalImage" : 0,
"SemanticProcessingNameArray" : null,
"Timeout" : 10000
}
],
"GlobalParameter" :
{
"MaxTotalImageDimension" : 0
},
"ImageParameterOptions" :
[
{
"BaseImageParameterName" : "",
"BinarizationModes" :
[
{
"BinarizationThreshold" : -1,
"BlockSizeX" : 5,
"BlockSizeY" : 5,
"EnableFillBinaryVacancy" : 1,
"GrayscaleEnhancementModesIndex" : -1,
"Mode" : "BM_LOCAL_BLOCK",
"MorphOperation" : "Close",
"MorphOperationKernelSizeX" : -1,
"MorphOperationKernelSizeY" : -1,
"MorphShape" : "Rectangle",
"ThresholdCompensation" : 5
}
],
"ColourConversionModes" :
[
{
"BlueChannelWeight" : -1,
"GreenChannelWeight" : -1,
"Mode" : "CICM_GENERAL",
"RedChannelWeight" : -1,
"ReferChannel" : "H_CHANNEL"
}
],
"GrayscaleEnhancementModes" :
[
{
"Mode" : "GEM_GENERAL",
"Sensitivity" : -1,
"SharpenBlockSizeX" : -1,
"SharpenBlockSizeY" : -1,
"SmoothBlockSizeX" : -1,
"SmoothBlockSizeY" : -1
}
],
"GrayscaleTransformationModes" :
[
{
"Mode" : "GTM_ORIGINAL"
}
],
"IfEraseTextZone" : 1,
"Name" : "IP_1",
"RegionPredetectionModes" :
[
{
"AspectRatioRange" : "[]",
"FindAccurateBoundary" : 0,
"ForeAndBackgroundColours" : "[]",
"HeightRange" : "[]",
"ImageParameterName" : "",
"MeasuredByPercentage" : 1,
"MinImageDimension" : 262144,
"Mode" : "RPM_GENERAL",
"RelativeRegions" : "[]",
"Sensitivity" : 1,
"SpatialIndexBlockSize" : 5,
"WidthRange" : "[]"
}
],
"ScaleDownThreshold" : 2300,
"ScaleUpModes" :
[
{
"AcuteAngleWithXThreshold" : 0,
"LetterHeightThreshold" : 0,
"Mode" : "SUM_LINEAR_INTERPOLATION",
"ModuleSizeThreshold" : 4,
"TargetLetterHeight" : 0,
"TargetModuleSize" : 6
}
],
"TextDetectionMode" :
{
"CharHeightRange" :
[
1,
1000,
1
],
"Direction" : "UNKNOWN",
"MaxSpacingInALine" : -1,
"Mode" : "TTDM_LINE",
"Sensitivity" : 3,
"StringLengthRange" : null
},
"TextureDetectionModes" :
[
{
"Mode" : "TDM_GENERAL_WIDTH_CONCENTRATION",
"Sensitivity" : 5
}
]
},
{
"BaseImageParameterName" : "",
"BinarizationModes" :
[
{
"BinarizationThreshold" : -1,
"BlockSizeX" : 0,
"BlockSizeY" : 0,
"EnableFillBinaryVacancy" : 1,
"GrayscaleEnhancementModesIndex" : -1,
"Mode" : "BM_LOCAL_BLOCK",
"MorphOperation" : "Close",
"MorphOperationKernelSizeX" : -1,
"MorphOperationKernelSizeY" : -1,
"MorphShape" : "Rectangle",
"ThresholdCompensation" : 10
}
],
"ColourConversionModes" :
[
{
"BlueChannelWeight" : -1,
"GreenChannelWeight" : -1,
"Mode" : "CICM_GENERAL",
"RedChannelWeight" : -1,
"ReferChannel" : "H_CHANNEL"
}
],
"GrayscaleEnhancementModes" :
[
{
"Mode" : "GEM_GENERAL",
"Sensitivity" : -1,
"SharpenBlockSizeX" : -1,
"SharpenBlockSizeY" : -1,
"SmoothBlockSizeX" : -1,
"SmoothBlockSizeY" : -1
}
],
"GrayscaleTransformationModes" :
[
{
"Mode" : "GTM_ORIGINAL"
}
],
"IfEraseTextZone" : 1,
"Name" : "IP_Decode",
"RegionPredetectionModes" :
[
{
"AspectRatioRange" : "[]",
"FindAccurateBoundary" : 0,
"ForeAndBackgroundColours" : "[]",
"HeightRange" : "[]",
"ImageParameterName" : "",
"MeasuredByPercentage" : 1,
"MinImageDimension" : 262144,
"Mode" : "RPM_GENERAL",
"RelativeRegions" : "[]",
"Sensitivity" : 1,
"SpatialIndexBlockSize" : 5,
"WidthRange" : "[]"
}
],
"ScaleDownThreshold" : 99999,
"ScaleUpModes" :
[
{
"AcuteAngleWithXThreshold" : -1,
"LetterHeightThreshold" : 0,
"Mode" : "SUM_AUTO",
"ModuleSizeThreshold" : 0,
"TargetLetterHeight" : 0,
"TargetModuleSize" : 0
}
],
"TextDetectionMode" :
{
"CharHeightRange" :
[
1,
1000,
1
],
"Direction" : "UNKNOWN",
"MaxSpacingInALine" : -1,
"Mode" : "TTDM_LINE",
"Sensitivity" : 3,
"StringLengthRange" : null
},
"TextureDetectionModes" :
[
{
"Mode" : "TDM_GENERAL_WIDTH_CONCENTRATION",
"Sensitivity" : 5
}
]
}
],
"TargetROIDefOptions" :
[
{
"BaseTargetROIDefName" : "",
"Location" :
{
"Offset" :
{
"FirstPoint" :
[
0,
0,
1,
1
],
"FourthPoint" :
[
0,
100,
1,
1
],
"MeasuredByPercentage" : 1,
"ReferenceObjectOriginIndex" : 0,
"ReferenceObjectType" : "ROT_ATOMIC_OBJECT",
"ReferenceXAxis" :
{
"AxisType" : "AT_MIDPOINT_EDGE",
"EdgeIndex" : 0,
"LengthReference" : "LR_X",
"RotationAngle" : 90
},
"ReferenceYAxis" :
{
"AxisType" : "AT_MIDPOINT_EDGE",
"EdgeIndex" : 1,
"LengthReference" : "LR_Y",
"RotationAngle" : 90
},
"SecondPoint" :
[
100,
0,
1,
1
],
"ThirdPoint" :
[
100,
100,
1,
1
]
}
},
"Name" : "roi_default",
"PauseFlag" : 0,
"TaskSettingNameArray" :
[
"BR_1"
]
}
]
}
Read this case study to see how Naturalis ARISE, a scientific research consortium, achieved high accuracy and offline capability for reading tiny Data Matrix codes on specimen containers, even through plastic bags, test tubes, and liquids, in remote outdoor locations with the help of Dynamsoft Barcode Reader SDK.